When you double click on a food or create a new food, the food dialog is displayed. If the food you double clicked on was in the USDA tree, you will not be able to save your changes to the food (there won't be an OK button). If you are creating a new food or editing an existing user food, pressing the OK button will save your changes.
On the food dialog, you can change the name of the food, the category that the food is in and the amount of each nutrient in the food. Before entering nutrients, you should first select an appropriate measure. You can change the amount and the unit of the measure of the displayed food. When you change these fields, the amount of each nutrient will be adjusted. So if l g of the food had 1 calorie, 2oz of the food will have 46 calories. Once you have set the amount of the food, you can enter the amount of each nutrient in that quantity of food. So if you have nutrition information for one serving of a food, select the weight of one serving of that food, then enter the nutrition info.
As you enter each nutrients value, the program will score that nutrient and update the score for the food. If you are using WeightWatchers® the dialog will also display the number of points in this food
Even if the food has multiple measures, all measures will be updated for the changes that you make to the nutrient values.
If you are creating a food from scratch it is probably easier to use the New Food Wizard than this dialog. The Wizard will allow you to enter the information on the nutrition label and add new measures.
The Print button will print the dialog exactly as it is shown on the screen
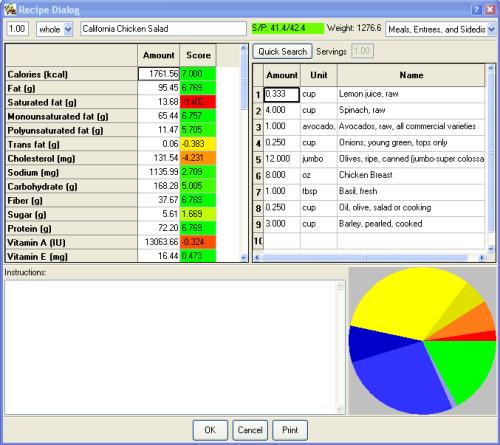
When you double click on a recipe or create a new recipe, the recipe dialog is displayed.
The recipe dialog allows you to change the name and the category of the recipe. Unlike the food dialog, the nutrient information cannot be changed. The nutrient values for a recipe are calculated based on the foods that you add to it.
To add a food to a recipe, find the food in either the USDA or User food trees, and drag the appropriate measure of that food into your recipe. If the recipe calls for a weight of the food (oz, grams, pounds, etc), drag a weight measure into the recipe. If the recipe calls for a volume measure (cup, tsp, tbs, quart, etc), drag the volume measure that best matches what the recipe calls for.
You can also add another whole recipe to a new recipe. Just drag the appropriate measure of that recipe from the recipe tree into the ingredient list.
Once you have added the food to the recipe, you can change the amount and the unit. So if you dragged over the cup measure, you can change to any of the other volume measures (it will assume the food is prepared the same way and just scale the weight). If you dragged over the gram measure, you can change to any of the weight measures.
To have accurate nutrient information, it is important to have the right weight of each ingredient.
If you make a mistake, you can right click on the row to delete the food from the recipe. Double clicking on a row brings up that food. The quick search button will bring up the Quick Food Entry dialog which will allow you to quickly find the foods in the recipe and add them.
When creating a new recipe, you will not be able to change the amount or the unit of the recipe itself. A new recipe is always created as a 'whole'. As you add ingredients to the recipe, the program calculates the weight of the whole recipe and creates three measures, one for the whole recipe, one for a single gram of the recipe and one for a serving of the recipe. You can add new measures to the recipe by right clicking on the recipe and selecting “Add Measure”
The Print button will print the dialog exactly as it is shown on the screen
The measurement dialog allows you to add a new measure to a food or recipe. A new measure is always based on the weight of an existing measure. The dialog shows the original measure (amount, units and weight) and allows you to enter a new measure (amount, units and a description).
Say for example you have the food 'Onions' with the measure 'gram', and you want to create a new measure for a 'medium' onion. The existing gram measure has the nutrient amounts in one gram of onions. When you create a new measure, you will be able to select any existing measure as the original measure. For this example you would select the existing gram measure. Then you would enter 1 as the amount of the new measure, and type in medium as the unit for the new measure. Then you would weigh a medium onion and select that weight as the amount of the original measure. The program will now know that one medium onion weighs x grams. Imagine that you then chop this onion and you end up with 1.5 cups. You could then make another measure by selecting 'medium' as the original unit, 1 as the original amount, 1.5 as the new amount, 'cup' as the new unit, and chopped as the description. This would tell the program that one medium onion produces 1 cup of chopped onion.
The description field is only active if you are adding a volume measure. This is because the preparation of the food only matters for volume measures. One gram of chopped onion weighs the same as 1 gram of diced onion.
When you create a new weight measure (grams, ounces, pounds, etc.) the program doesn't let you enter a description or a weight for the new measure. Instead the program simply converts from a unit that it already has (grams) to the new unit you are adding and fills in the weight for you. So if you have recipes that call for onions in ounces, you can create a new ounce measure for onions by entering "oz" into the new measure's unit field. Now you can drag ounces of onions directly to your recipe instead of dragging grams and changing it to ounces
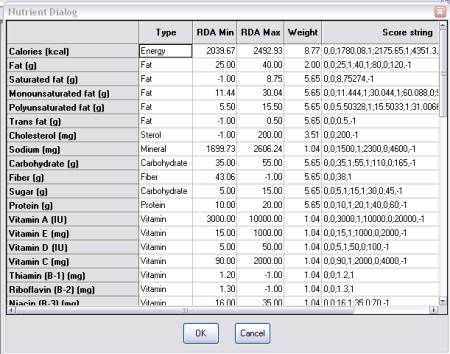
The Nutrient dialog allows you to edit the RDA min and max, and the scoring rules for each nutrient. Note that you can't add or remove nutrients with this dialog. The list of nutrients is displayed with the RDA values, the weight of this nutrient and the score string. See: scoring for information about how the weight and score string are used to generate the score of a food or recipe.
To help when entering score strings, you can get a graph of the score for each nutrient by double clicking on the name of the nutrient.
The category dialog can be used to edit the name of an existing category, create a new category or delete an empty category. The category must be empty before it can be deleted, so you will not be able to delete any of the categories used by the USDA foods.
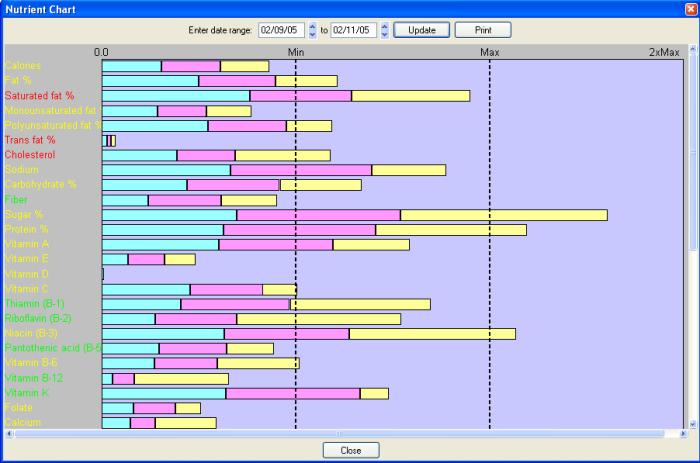
The nutrient chart displays a graphical summary of the how much of each nutrient your have consumed in a given day or over a range of days. When you first bring up the chart, it will display the summary for the current day. You can change the date range and hit the update button to see a different day or a range of days.
Each day that is displayed is shown in a different color
The chart shows the min/max and 2xMax lines for each nutrient. These lines represent the RDA min/max and twice the RDA max for each nutrient. If a nutrient doesn't have a min, the min line represents 1/2 of the max. These nutrients are shown in red. If a nutrient doesn't have a max, the max line represents twice the minimum. These nutrients are shown in green. All other nutrients which have both a min and max RDA value are shown in yellow.
The Print button will print the dialog exactly as it is shown on the screen
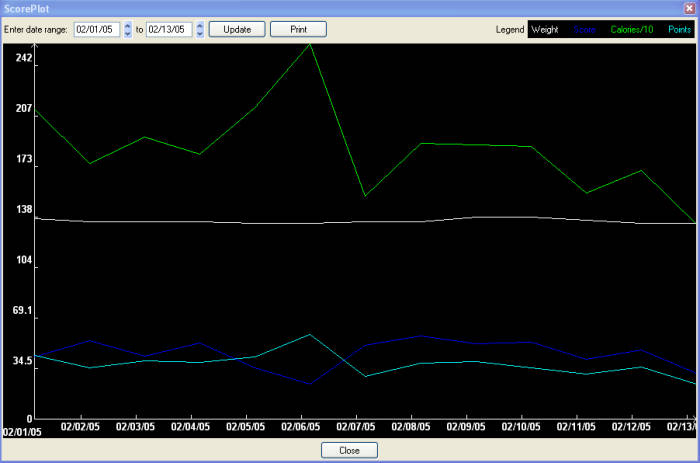
The Score Plot displays the number of calories consumed per day, your weight, the day's score, and, if you are using weight watchers, the number of points consumed in the day over a range of days.
Select a time range and hit update to plot a different period of time
The Print button will print the dialog exactly as it is shown on the screen
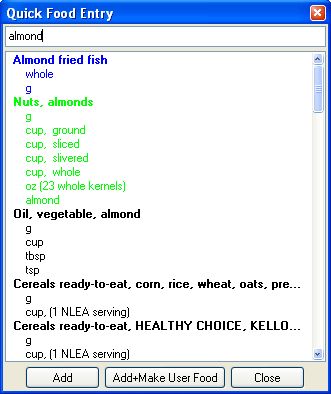
The quick entry dialog allows you to search for foods or recipes and add the found foods to either a recipe or day. As you type the name of the food into the search box, the program will fill in the results list with foods that match the search criteria (you have to have four letters entered before it will start looking for matches). The search is not case or order sensitive.
The list will show the foods and their measures. You simply double click the measure that you want to add to the recipe or day. The dialog will stay up so that you can search for, and add multiple ingredients at once.
Along with double clicking, you can press the 'Add' button to add the food. The 'Add+Make User Food' will add the selected USDA food to your recipe and copy that food into your user food list. Use this for foods that you consume frequently so that they appear at the top of the search next time.
The foods will be color coded based on where they were found. Recipes will be colored blue, user foods will be green and USDA foods will be black.